Refinishing an old wooden coffee table can transform it into a stunning, custom piece, extending its life and updating your home decor. This process typically takes a weekend to a full week, depending on the table’s condition and the chosen finish, with drying times for stain, paint, and topcoat layers often requiring 12-24 hours each. It’s a sustainable choice that reduces waste and adds a unique, handcrafted touch to any room.
Why Refinish Your Old Wooden Coffee Table?
Refinishing an old wooden coffee table offers numerous benefits beyond just aesthetic appeal. It’s a sustainable choice, extending the life of existing furniture and reducing waste. A fresh finish can dramatically update a dated piece, allowing it to seamlessly integrate with evolving interior design trends or personal tastes. A well-refinished table provides a durable surface, protecting the wood from future wear and tear while enhancing its natural beauty and character. It’s a rewarding DIY project that adds a unique, handcrafted touch to your decor, often at a fraction of the cost of buying new.
Essential Tools and Materials for Refinishing
Embarking on a coffee table refinishing project requires a few key tools and materials to ensure a smooth and successful outcome. Having everything ready before you start will streamline the process and prevent interruptions.
Tools:
- Orbital Sander: Ideal for large, flat surfaces, significantly speeding up the sanding process.
- Sanding Block/Detail Sander: Crucial for intricate areas, edges, and curved legs where an orbital sander cannot reach.
- Sandpaper: A variety of grits (e.g., 80-grit, 120-grit, 220-grit, 320-grit) for progressive sanding stages.
- Putty Knife/Scraper: Useful for applying wood filler and, if using, scraping off chemical stripper.
- Foam Brushes/Rollers: Excellent for applying stain, paint, and topcoats evenly and minimizing brush marks.
- Lint-Free Cloths: Essential for wiping away dust, applying stain, and buffing.
- Protective Gear: Safety glasses, gloves, and a respirator mask are critical for protecting yourself from dust and chemical fumes.
Materials:
- Wood Cleaner/Mild Dish Soap: For initial cleaning of the table surface.
- Mineral Spirits/Denatured Alcohol: To remove fine dust and residue after sanding.
- Wood Filler: To repair dents, scratches, or holes.
- Wood Stain: If you desire to change or enhance the wood’s color. Choose between oil-based or water-based varieties.
- Wood Paint (Optional): If you prefer a painted finish.
- Primer (Optional): Recommended before painting, especially for dark wood or light paint colors.
- Clear Topcoat: Polycrylic, polyurethane, or wax to seal and protect the new finish.
- Painter’s Tape: To protect areas you don’t want to stain or paint.
- Drop Cloths/Plastic Sheeting: To protect your workspace.
Step-by-Step Guide to Refinishing Your Coffee Table
Transforming an old coffee table from worn to wonderful involves several methodical steps. Patience and attention to detail at each stage will yield the best results.
Step 1: Preparation is Key
|
Our Picks for the Best Coffee Table in 2026
As an Amazon Associate I earn from qualifying purchases.
|
||
| Num | Product | Action |
|---|---|---|
| 1 | HOOBRO Coffee Table for Living Room, Oval Small Coffee Table with 2-Tier Open Storage Shelf, Industrial Cocktail Tea Table, Wooden Desktop Center Table, Farmhouse, Home Office, Rustic Brown BF09KF01 |

|
| 2 | Smuxee Nesting Coffee Table Set of 2, 23.6" Round Coffee Table Wood Grain Top with Adjustable Non-Slip Feet, Industrial End Table Side Tables for Living Room Bedroom Balcony Yard |
|
| 3 | Furinno Andrey Coffee Table with Bin Drawer, Amber Pine/Black Small Non-Lift Top |
|
| 4 | Coffee Table Rectangular Center Table for Living Room Open Space Side Table with Metal Frame, Easy Assembly, Black+ Rustic Brown Wood Coffee Table |
|
| 5 | Square Nesting Coffee Table Set of 2, 23.6"+19.7" Nesting Tables,Small Square Coffee Table with Fluted,Center Table for Living Room Bedroom Office Balcony Yard (Walnut) |
|
| 6 | 35.4" Rectangular Coffee Table for Living Room, Modern Industrial Style Coffee Table Center Table with Metal Frame for Small Space, Apartment, Office, Easy Assembly, Brown |
|
| 7 | Japanese Low Floor Table Folding Coffee Tables,22.5''x13.5'' Paulownia Wood Tables Tatami Tables Meditation Table Altar with Storage |
|
| 8 | Mid Century Modern Solid Wooden Coffee Table,Small UniqueTriangle Wood Center Tables, Sturdy TeaTable Suitable for Living Room Bedroom Balcony Patio Walnut |
|
| 9 | Furinno Andrey Coffee Table with Bin Drawer, Columbia Walnut/Dark Brown |
|
| 10 | CAJCA Coffee Table for Living Room Mid Century Modern Center Table with Glass Top and Wood, Brown/Walnut |
|
Proper preparation sets the foundation for a successful refinishing project. Begin by choosing a well-ventilated workspace, ideally outdoors or in a garage, to minimize dust and fume exposure. Lay down drop cloths or plastic sheeting to protect your floors and surrounding areas. Carefully disassemble any removable parts of the coffee table, such as drawers, shelves, or legs, and remove all hardware like knobs or pulls. Place screws and hardware in a labeled bag to prevent loss. Finally, clean the entire table surface thoroughly with a mild wood cleaner or a solution of dish soap and water to remove dirt, grease, and grime. Allow the table to dry completely before moving on.
Step 2: Removing the Old Finish
This is arguably the most labor-intensive step, but crucial for a lasting new finish.
Sanding Method: Start with a coarse-grit sandpaper (e.g., 80-grit) attached to your orbital sander for large, flat areas, or a sanding block for smaller sections. Apply even pressure and always sand with the grain of the wood to prevent unsightly swirl marks or scratches that will become prominent once stained. Progressively move to medium-grit sandpaper (120-grit or 150-grit) to smooth out the initial scratches, then finish with a fine-grit (220-grit) to achieve a silky-smooth surface. After each sanding stage, use a tack cloth or a vacuum to thoroughly remove all dust before moving to the next grit. Skipping grits can leave deeper scratches that a finer grit won’t fully remove.
Chemical Stripper Method (Optional, for stubborn finishes): For very thick or stubborn finishes, a chemical stripper can be used to soften and remove the old coating more quickly. Apply the stripper evenly and thickly according to the manufacturer’s instructions. Allow it to sit for the recommended time, then gently scrape off the softened finish with a putty knife. Be cautious not to dig into the wood. After stripping, clean the surface with mineral spirits or denatured alcohol to remove any stripper residue, then proceed with a light sanding using 220-grit sandpaper to ensure a perfectly smooth surface. to wear appropriate safety gear when working with chemical strippers.
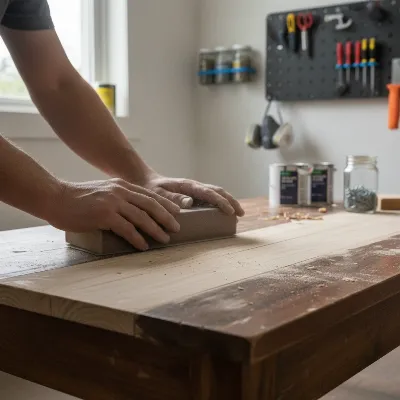 Refinishing a wooden coffee table by hand sanding with a block, demonstrating the careful removal of old finish.
Step 3: Repairing Imperfections
Once the old finish is completely removed and the wood is clean, inspect the table for any dents, scratches, or small holes. Use a high-quality wood filler to fill these imperfections. Apply the filler with a putty knife, pressing it firmly into the damaged areas. Overfill slightly, as wood filler can shrink as it dries. Once completely dry, sand the filled areas smooth with fine-grit (220-grit) sandpaper, ensuring they are flush with the surrounding wood surface. Clean away any dust created by sanding.
Step 4: Applying Stain or Paint
This step brings your coffee table’s new aesthetic to life.
Staining: If you choose to stain, gently stir the stain (do not shake, as this creates bubbles). Apply the stain using a lint-free cloth or a foam brush, moving with the wood grain in long, even strokes. Allow the stain to penetrate for the time recommended by the manufacturer (typically 5-15 minutes), then wipe off any excess with a clean, lint-free cloth, again following the grain. For a deeper, richer color, apply additional coats, allowing each to dry completely before applying the next. Always let the final stain coat dry for at least 24 hours in a dust-free environment.
Painting: For a painted finish, first apply a coat of primer, especially if you’re using a light paint color over dark wood, or if the wood is highly porous. Use a foam roller for flat surfaces and a small brush for corners and detailed areas, applying thin, even coats. Let the primer dry thoroughly. Next, apply your chosen paint in thin, even coats, allowing each coat to dry completely before applying the next. Two to three coats are usually sufficient for full, consistent coverage. Painting in thin layers prevents drips and ensures a smooth finish.
Step 5: Sealing for Protection
The final step is crucial for protecting your newly refinished coffee table and ensuring its longevity. A clear topcoat will guard against spills, scratches, and daily wear.
Apply your chosen clear topcoat—Polycrylic, Polyurethane, or wax—using a foam brush or roller. Apply in thin, even coats, moving with the wood grain. Avoid shaking the can to prevent bubbles, and if any appear, gently brush them out. Allow each coat to dry completely according to the product instructions. Between coats, lightly sand the surface with a very fine-grit sandpaper (e.g., 320-grit) to create a smooth surface for the next layer to adhere to. This step also helps to knock down any dust nibs. After sanding, wipe away all dust with a tack cloth before applying the next coat. Apply two to three coats for adequate protection. For the final coat, do not sand after application to maintain a pristine finish.
- Polycrylic: A water-based, clear finish that dries quickly and does not yellow over time, making it excellent for lighter stains or painted finishes.
- Polyurethane: A durable finish available in oil-based (can yellow slightly) and water-based formulas. It offers excellent protection for high-traffic pieces.
- Wax: Provides a softer, more matte finish. It’s less durable than polycrylic or polyurethane for heavy-use surfaces and may require reapplication over time.
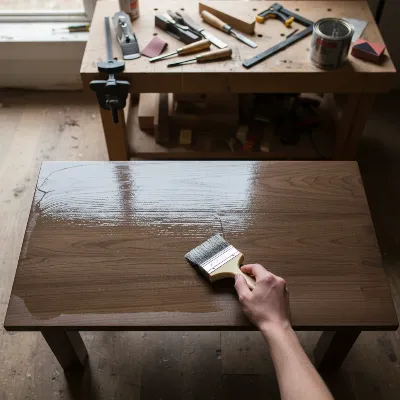 Applying a clear protective topcoat to a refinished wooden coffee table, highlighting the sealing process.
Common Mistakes to Avoid During Refinishing
Refinishing furniture can be a rewarding DIY project, but certain missteps can hinder your results. Being aware of these common mistakes will help you achieve a professional-looking finish.
One of the most frequent errors is sanding against the wood grain. This creates irreversible scratches that become highly visible once stain or a clear coat is applied. Always follow the natural direction of the wood fibers. Another pitfall is skipping sandpaper grits. Jumping from a very coarse grit directly to a fine one will not effectively remove the deeper scratches, leaving a rough surface. Progress gradually through different grits for optimal smoothness.
Not cleaning dust adequately between steps is another common mistake. Tiny dust particles left on the surface can get trapped under stain or finish, creating an uneven, bumpy texture. Always wipe thoroughly with a tack cloth. Rushing drying times between coats of stain, paint, or topcoat can lead to tacky surfaces, poor adhesion, and an inability to build a durable finish. Patience is key; always allow each layer to dry completely according to manufacturer instructions.
Finally, applying coats too thickly or applying too many layers can result in a plastic-like appearance, drips, or an uneven finish that obscures the wood’s natural beauty. Thin, even coats are always preferable. It is also crucial to read and follow the manufacturer’s instructions for all products used, as application techniques and drying times can vary significantly between brands. Ignoring these guidelines can lead to disappointing results.
Choosing the Right Finish: Stain, Paint, or Natural
Deciding on the finish is a critical creative choice that impacts the overall look and feel of your coffee table. Each option offers distinct advantages.
Stain is an excellent choice for those who appreciate the natural beauty of wood grain. It penetrates the wood fibers, enhancing their patterns and adding color without obscuring the material’s inherent character. Staining allows you to transform light wood into a darker tone or simply enrich an existing shade, lending a classic, warm, or rustic aesthetic.
Paint offers full coverage and endless color possibilities, making it ideal for hiding imperfections or completely updating a table’s style to match contemporary decor. It provides a crisp, uniform look and allows for bold statements or subtle accents, perfect for achieving a modern, farmhouse, or shabby chic vibe.
Opting for a natural finish means applying only a clear topcoat directly to the sanded, raw wood. This choice celebrates the wood’s original color and grain, offering a minimalist and authentic look. It highlights the unique variations and warmth of the wood, providing a timeless appeal that fits well with various design styles, from Scandinavian to rustic. The decision ultimately depends on your desired aesthetic and the condition of the wood you are working with.
Maintenance Tips for Your Refinished Coffee Table
Once you’ve dedicated time and effort to refinishing your wooden coffee table, proper maintenance is essential to preserve its beauty and durability for years to come. Regular cleaning is fundamental; simply wipe down the surface with a soft, damp cloth and a mild wood cleaner, avoiding harsh chemicals that can strip or damage the finish. Always wipe up spills immediately to prevent water rings or stains from setting in.
Protect the surface from heat and moisture by using coasters under drinks and trivets under hot items. Direct sunlight can also cause fading or discoloration over time, so consider placing your table away from harsh sun exposure or using blinds to filter light. Depending on the type of topcoat used, periodic reapplication may be necessary. For wax finishes, re-waxing every six months to a year can help maintain its luster and protection. For polyurethane or polycrylic finishes, a light sanding and a new clear coat might be needed every few years, especially on heavily used areas, to refresh the protective layer and address minor wear. Consistent care will ensure your revitalized coffee table remains a cherished piece in your home.
Conclusion
Refinishing an old wooden coffee table is a transformative project that brings new life to a beloved piece of furniture, enhancing both its aesthetic appeal and longevity. By carefully following the steps of preparation, old finish removal, repair, and new finish application, you can achieve professional-quality results that will impress. Whether you choose a rich stain to highlight the natural wood grain, a vibrant paint color for a modern statement, or a simple clear coat to celebrate its raw beauty, the effort invested will yield a truly unique and cherished centerpiece for your living space. Don’t let an aging table gather dust; unlock its hidden potential and enjoy the satisfaction of a beautifully restored heirloom. What new life will you bring to your next furniture project?
Frequently Asked Questions
How long does it typically take to refinish a coffee table?
The total time can vary greatly depending on the table’s condition, the chosen finish, and your experience level. Expect anywhere from a weekend to a full week, factoring in drying times for stain, paint, and multiple topcoat layers, which often require 12-24 hours each.
Can I refinish a coffee table without sanding?
While heavy sanding is often recommended for best results, some products, like certain gel stains, are designed to be applied over existing finishes with minimal or no sanding, offering a quicker refresh. However, thorough cleaning and light scuff-sanding are usually advisable for proper adhesion.
What’s the best topcoat for a coffee table that gets a lot of use?
For high-traffic coffee tables, polyurethane is generally considered the most durable topcoat. It provides excellent protection against scratches, spills, and general wear. Water-based polycrylic is also a good option, especially for lighter finishes, as it won’t yellow over time.
How do I fix a sticky or tacky finish on my refinished coffee table?
A sticky or tacky finish usually indicates that the previous coat wasn’t fully dry before the next was applied, or there was a reaction between products. Allow ample time for the finish to cure in a well-ventilated area. If it persists, you may need to lightly sand the tacky layer and reapply the topcoat correctly, ensuring sufficient drying time between layers.
Frequently Asked Questions
How long does it typically take to refinish a coffee table?
The total time to refinish a coffee table can vary from a weekend to a full week. This depends on the table's condition, the chosen finish, and your experience level, with drying times for stain, paint, and multiple topcoat layers often requiring 12-24 hours each.
Can I refinish a coffee table without sanding?
While heavy sanding is often recommended for best results, some products like certain gel stains are designed for application over existing finishes with minimal or no sanding. However, thorough cleaning and light scuff-sanding are usually advisable for proper adhesion and a durable finish.
What's the best topcoat for a coffee table that gets a lot of use?
For high-traffic coffee tables, polyurethane is generally considered the most durable topcoat, offering excellent protection against scratches, spills, and general wear. Water-based polycrylic is also a good option, especially for lighter finishes, as it won't yellow over time and provides strong protection.
How do I fix a sticky or tacky finish on my refinished coffee table?
A sticky or tacky finish usually indicates that the previous coat wasn't fully dry or there was a product reaction. Allow ample time for the finish to cure in a well-ventilated area. If stickiness persists, lightly sand the tacky layer with fine-grit sandpaper and reapply the topcoat correctly, ensuring sufficient drying time between layers.
What are the key benefits of refinishing an old coffee table?
Refinishing an old coffee table offers several benefits, including extending the furniture's life, reducing waste, and updating its aesthetic to match current decor trends. It also provides a durable surface, protecting the wood from future wear and tear, and adds a unique, handcrafted touch to your home.
How to Refinish an Old Wooden Coffee Table
Transform your worn-out wooden coffee table into a beautiful, custom piece by following these step-by-step instructions for preparation, finish removal, repair, and application of a new finish.
Choose a well-ventilated area and lay down drop cloths. Disassemble removable parts and hardware, storing them safely. Thoroughly clean the table surface with a mild wood cleaner and allow it to dry completely before proceeding.
Use an orbital sander with 80-grit sandpaper, always sanding with the wood grain. Progress to 120-grit, then 220-grit sandpaper for a smooth surface. Alternatively, use a chemical stripper for stubborn finishes, following manufacturer instructions and wearing safety gear. Clean all dust after each step.
Inspect the table for dents, scratches, or holes. Apply wood filler with a putty knife, slightly overfilling the damaged areas. Once dry, sand the filled spots smooth with 220-grit sandpaper until flush with the surrounding wood, then clean away any dust.
For stain, stir gently and apply with a lint-free cloth or foam brush, wiping excess after 5-15 minutes. For paint, apply a primer first, then 2-3 thin, even coats of paint using a foam roller or brush. Allow each coat to dry completely for at least 24 hours.
Apply 2-3 thin, even coats of a clear topcoat (Polycrylic, Polyurethane, or wax) with a foam brush or roller, moving with the wood grain. Lightly sand with 320-grit sandpaper between coats to ensure adhesion and smoothness, wiping away dust before the next application. Do not sand the final coat.
Get our weekly buyer guide
Practical specs, not advice. Unsubscribe anytime.
This guide was really helpful for tackling my worn-out coffee table. I appreciated the tips on choosing the right topcoat for durability. My only minor complaint is that the drying times for the paint layers felt a bit longer than the 12-24 hours suggested, especially in my humid garage. Still, the table looks fantastic now and feels much more protected.
I followed the guide to refinish my grandmother’s old coffee table, and it looks absolutely amazing! The step-by-step instructions for sanding and applying the new stain were super clear. It took me a full weekend, just like it mentioned, but the result is a beautiful, custom piece that fits perfectly with my living room decor. So glad I didn’t just toss it!
I tried refinishing my coffee table using the methods described, focusing on updating a dated piece. While the overall process was straightforward, I found it challenging to get a perfectly smooth finish on the edges, even after multiple sanding passes. It looks better than before, but not quite as flawless as I’d hoped. Maybe I needed a different type of sander.
I’ve been wanting to update my living room without buying new furniture, and refinishing my coffee table was the perfect solution. The idea of making a sustainable choice really resonated with me. I used a dark walnut stain, and it totally transformed the piece, giving it a modern farmhouse feel. It was a fun project and definitely worth the effort.