Transforming a tired wood coffee table can breathe new life into your living space, and the good news is you don’t always need to endure the dusty, time-consuming chore of sanding. Imagine giving your centerpiece a fresh, vibrant look in a fraction of the time, skipping straight to the creative fun. This comprehensive guide will walk you through the simple yet effective techniques to achieve a beautiful, durable finish on your wood coffee table without ever picking up sandpaper, making furniture revitalization accessible and enjoyable for everyone.
Why Paint Without Sanding? The Benefits of No-Prep Painting
The primary allure of painting without sanding lies in its incredible convenience and speed. Traditional furniture painting often demands extensive preparation, including stripping old finishes, sanding to create a smooth profile, and then sanding again between coats. This can be a daunting task, especially for intricate pieces or those new to DIY projects. By opting for a no-sand approach, you significantly cut down on project time, reduce mess, and minimize the need for specialized tools. It’s perfect for quick makeovers, upcycling projects, or when you simply want to refresh a piece with minimal fuss.
Understanding No-Sand Painting Techniques
|
Our Picks for the Best Coffee Table in 2026
As an Amazon Associate I earn from qualifying purchases.
|
||
| Num | Product | Action |
|---|---|---|
| 1 | Square Nesting Coffee Table Set of 2, 23.6"+19.7" Nesting Tables,Small Square Coffee Table with Fluted,Center Table for Living Room Bedroom Office Balcony Yard (Walnut) |

|
| 2 | Furinno Andrey Coffee Table with Bin Drawer, Columbia Walnut/Dark Brown |
|
| 3 | 35.4" Rectangular Coffee Table for Living Room, Modern Industrial Style Coffee Table Center Table with Metal Frame for Small Space, Apartment, Office, Easy Assembly, Brown |
|
| 4 | Mid Century Modern Solid Wooden Coffee Table,Small UniqueTriangle Wood Center Tables, Sturdy TeaTable Suitable for Living Room Bedroom Balcony Patio Walnut |
|
| 5 | Coffee Table Rectangular Center Table for Living Room Open Space Side Table with Metal Frame, Easy Assembly, Black+ Rustic Brown Wood Coffee Table |
|
| 6 | Smuxee Nesting Coffee Table Set of 2, 23.6" Round Coffee Table Wood Grain Top with Adjustable Non-Slip Feet, Industrial End Table Side Tables for Living Room Bedroom Balcony Yard |
|
| 7 | Japanese Low Floor Table Folding Coffee Tables,22.5''x13.5'' Paulownia Wood Tables Tatami Tables Meditation Table Altar with Storage |
|
| 8 | HOOBRO Coffee Table for Living Room, Oval Small Coffee Table with 2-Tier Open Storage Shelf, Industrial Cocktail Tea Table, Wooden Desktop Center Table, Farmhouse, Home Office, Rustic Brown BF09KF01 |
|
| 9 | Furinno Andrey Coffee Table with Bin Drawer, Amber Pine/Black Small Non-Lift Top |
|
| 10 | CAJCA Coffee Table for Living Room Mid Century Modern Center Table with Glass Top and Wood, Brown/Walnut |
|
No-sand painting relies on specialized products and meticulous cleaning rather than abrasive preparation. Instead of roughing up the surface mechanically, you use chemical adhesion. This means employing powerful degreasers and high-quality bonding primers that are formulated to stick to slick or previously finished surfaces. Certain paint types, like chalk paint or mineral paint, inherently possess excellent adhesion properties, often eliminating the need for a separate primer on well-maintained surfaces. The key is to create a perfectly clean and stable surface for these adhesion-promoting products to do their job effectively, ensuring the paint binds securely and lasts for years.
When Is No-Sanding an Option? Assessing Your Coffee Table
While highly convenient, no-sanding techniques aren’t suitable for every coffee table. This method works best on wood tables with existing finishes that are generally in good condition—meaning they are not peeling, chipping, or heavily damaged. Surfaces that are relatively smooth, free from deep gouges, and simply need a refresh are ideal candidates. If your table has significant flaking paint, deep scratches, or is made of a very slick, non-porous material like laminate with a high-gloss finish, a light scuff sanding might still be beneficial for optimal adhesion, even with no-sand primers. Always conduct a small test patch in an inconspicuous area if you’re unsure about the surface’s receptiveness to no-sand products.
Essential Tools and Materials for a Smooth Finish
Success in painting without sanding hinges on using the right products. Gathering all your materials before you begin will streamline the process and prevent interruptions. You’ll need more than just paint; consider the cleaning agents, primers, and topcoats that are specifically designed for maximum adhesion and durability without abrasive preparation.
Choosing the Right No-Sanding Primer
A high-quality bonding primer is the cornerstone of any no-sand paint project, unless you’re using a paint specifically designed for direct application (like some chalk paints). Look for primers that explicitly state “high adhesion,” “bonding,” or “stain-blocking” on the label. Shellac-based primers are excellent for their superb adhesion and stain-blocking capabilities, particularly effective on glossy or previously varnished surfaces. Water-based adhesion primers are also available and offer easier cleanup, but ensure they are formulated for challenging surfaces. These primers create a strong bond with the existing finish, providing a perfectly grippy surface for your new paint to adhere to, preventing chipping and peeling down the line.
Selecting the Best Paint for Wood (No-Sand Formulas)
When it comes to the paint itself, several types excel in no-sanding scenarios. Chalk paint is a popular choice due to its matte finish and exceptional adhesion, often requiring no primer. Mineral paint (also known as all-in-one paint) offers a durable, built-in topcoat and adheres wonderfully to most surfaces without sanding or priming. Milk paint can also be used without sanding if a bonding agent is added. For those preferring conventional latex or acrylic paints, always pair them with a robust bonding primer to ensure proper adhesion. Opt for furniture-specific paints or those labeled for cabinets and trim, as they are typically more durable and offer a smoother finish than standard wall paints.
Brushes, Rollers, and Other Application Tools
The quality of your application tools directly impacts the final finish. For brushes, invest in high-quality synthetic bristles for water-based paints and primers, as they hold their shape and reduce brush marks. Look for angled brushes for cutting in and flat brushes for larger surfaces. For an ultra-smooth finish on flat areas, small foam rollers (high-density foam) are excellent. Additionally, you’ll need:
- Microfiber cloths for cleaning and wiping.
- Painter’s tape for protecting areas you don’t want to paint.
- Drop cloths or old sheets to protect your workspace.
- Nitrile gloves to protect your hands.
Cleaning and Degreasing Agents
Before any primer or paint touches your coffee table, a thorough cleaning is paramount. Residue like grease, dirt, and oils will prevent even the best bonding primers from adhering properly. You’ll need:
- A strong degreaser: Options include TSP (trisodium phosphate) substitute, a dedicated furniture degreaser, or even a diluted mixture of dish soap (like Dawn) and water.
- Denatured alcohol: Excellent for a final wipe-down, as it evaporates quickly and helps remove any lingering residues or oils.
- Warm water: For rinsing and mixing.
Using these agents will strip away surface contaminants, creating a clean canvas for your no-sand transformation.
Step-by-Step Guide: Painting Your Coffee Table Without Sanding
With your materials ready, it’s time to embark on the transformation. This step-by-step guide ensures a methodical approach, leading to a professional-looking finish without the need for any sanding. Remember that patience between coats is crucial for proper adhesion and durability.
Step 1: Thorough Cleaning and Preparation
This is arguably the most critical step in no-sand painting. Begin by removing any hardware (knobs, pulls) and wiping down the entire coffee table with a damp cloth to remove loose dust and grime. Next, use your chosen degreaser according to the product instructions. For example, if using a TSP substitute, mix it with water, apply it with a sponge or cloth, and scrub all surfaces. Pay special attention to areas prone to hand oils or spills. Rinse thoroughly with clean water, wiping with a fresh, damp cloth until no residue remains. Finally, perform a wipe-down with denatured alcohol. Allow the table to dry completely, which can take several hours, to ensure all moisture has evaporated. A clean, oil-free surface is essential for proper adhesion.
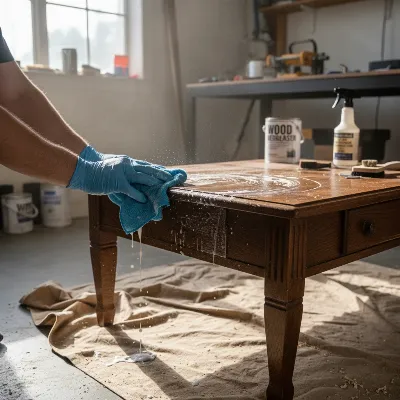 A person meticulously cleaning a vintage wooden coffee table with a degreaser solution, preparing it for painting without sanding.
Step 2: Applying the Adhesion Primer
Once your coffee table is immaculately clean and dry, it’s time for the primer. Stir your bonding primer well. Apply a thin, even coat using a high-quality synthetic brush or foam roller. Work in small sections, moving in the direction of the wood grain where applicable. Avoid applying too much primer, as thick coats can lead to drips or an uneven surface. The goal is complete, thin coverage. Allow the first coat to dry completely according to the manufacturer’s instructions, which can range from 1-4 hours. Some primers may require a second thin coat, especially on very dark or glossy surfaces, to ensure maximum adhesion and stain-blocking. Always check the product label for specific recommendations.
Step 3: Painting with Your Chosen Color
After the primer has fully cured, it’s time for the color! Stir your paint thoroughly. Apply your first thin coat of paint, again using a high-quality brush or roller. Remember, several thin coats are always better than one thick coat, as thin coats dry more evenly and are less prone to dripping or clumping. Maintain consistent brush strokes or roller direction for a smooth finish. Allow each coat to dry completely before applying the next. This typically takes 2-4 hours per coat, but humidity can affect drying times. Most projects require two to three coats of paint to achieve full coverage and a rich, opaque color.
Step 4: Curing and Applying a Protective Topcoat
Once your final paint coat has dried to the touch, it’s crucial to understand that it’s not yet fully cured. Paint curing is a chemical process that strengthens the finish, and it can take anywhere from a few days to several weeks, depending on the paint type and environmental conditions. During this time, treat the table gently.
For a coffee table, a protective topcoat is non-negotiable for durability, especially since it’s a high-traffic piece of furniture. A water-based polyurethane or polycrylic is typically recommended for its durability and non-yellowing properties. Apply two to three thin, even coats of your chosen topcoat, allowing each coat to dry fully according to the manufacturer’s instructions. A topcoat will protect your paint from scratches, spills, and general wear and tear, ensuring your no-sand makeover lasts.
Tips for a Flawless, Durable, No-Sand Finish
Achieving a professional-looking finish without sanding requires attention to detail. These expert tips will help you avoid common pitfalls and ensure your painted coffee table looks stunning and stands the test of time.
Achieving a Streak-Free Look
To minimize brush strokes and achieve a smooth, professional finish:
- Use quality tools: High-density foam rollers for flat surfaces and good quality synthetic brushes for edges and details are key.
- Don’t overload your brush/roller: Apply thin, even coats.
- Work quickly and continuously: Avoid stopping in the middle of a surface, as this can create lap lines.
- Flow extender: For some paints, adding a paint conditioner or flow extender can help the paint level out, reducing brush marks.
- Maintain a “wet edge”: Always work into a previously painted, still-wet area to blend seamlessly.
Dealing with Imperfections and Blemishes
Even without sanding, minor imperfections might appear.
- Dust nibs: If small dust particles settle in wet paint, wait until the paint is completely dry, then gently (very gently!) buff them out with a very fine-grit sanding sponge (220-grit or higher) or a piece of brown paper bag, and then apply another thin coat of paint.
- Drips or runs: If you catch a drip while the paint is wet, gently brush it out. If it dries, wait until it’s completely dry, then very carefully scrape it off with a razor blade held at a low angle, or lightly sand with a fine-grit block, then repaint the area.
Remember, careful preparation significantly reduces these issues.
Maintaining Your Newly Painted Coffee Table
Proper maintenance will extend the life of your no-sand painted coffee table:
- Use coasters: Always use coasters under drinks to prevent water rings and heat damage.
- Clean gently: Wipe spills immediately with a soft, damp cloth. Avoid abrasive cleaners or harsh chemicals, as they can damage the topcoat and paint.
- Avoid excessive moisture: Don’t leave wet items on the surface.
- Lift, don’t drag: When moving decorative items, lift them to avoid scratching the surface.
Following these simple guidelines will keep your table looking fresh and new for years.
Common Mistakes to Avoid When Painting Without Sanding
While skipping the sanding step is a major time-saver, there are specific mistakes that can sabotage your project if not avoided. Understanding these pitfalls will ensure your efforts result in a durable and beautiful finish.
Skipping the Cleaning Step
This is perhaps the most critical error. Many DIYers underestimate the importance of thorough cleaning, especially when not sanding. Any lingering grease, grime, or residue—even invisible to the naked eye—will act as a barrier between your primer/paint and the original finish. This leads to poor adhesion, causing the paint to peel, chip, or scratch off easily over time. Always assume your surface is dirtier than it looks and dedicate ample time to cleaning and degreasing. The cleaner the surface, the better the bond.
Using the Wrong Products
Not all primers and paints are created equal, especially for no-sand projects. Using a standard latex primer not designed for adhesion to slick surfaces, or a cheap wall paint without proper preparation, will likely result in disappointment.
> “The success of a no-sanding project truly lies in the quality and formulation of your adhesion primer and paint. Don’t skimp on these critical materials; they are your substitutes for abrasive prep.” – Sarah Miller, Professional Furniture Restorer
Always select products specifically formulated for high adhesion, such as bonding primers, chalk paint, or mineral paint, and pair them with a durable topcoat appropriate for high-use furniture like a coffee table.
Rushing the Drying and Curing Times
Patience is a virtue in painting. Each coat—primer, paint, and topcoat—requires sufficient time to dry and cure. Drying to the touch means the surface is dry, but the paint layers underneath are still soft. Curing is the process where the paint hardens and reaches its maximum durability. Rushing this process by applying subsequent coats too soon or putting the table back into heavy use before it’s fully cured will lead to peeling, dents, or a less-than-durable finish. Always adhere to the manufacturer’s recommended drying and curing times, even if it means waiting a bit longer.
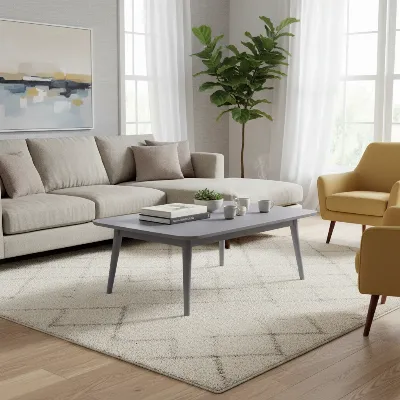 A beautifully painted modern wooden coffee table, without visible brush strokes, serving as a stylish centerpiece in a contemporary living room.
Conclusion
Giving your wood coffee table a fresh new look doesn’t have to be a messy, laborious affair involving endless sanding. By focusing on thorough cleaning, selecting the right adhesion-promoting primers and paints, and applying thin, even coats, you can achieve a stunning, durable transformation with minimal effort. This no-sand approach makes furniture upcycling accessible and enjoyable, proving that sometimes, less truly is more. So, why not pick a color, grab your brush, and give that coffee table the makeover it deserves? What exciting color will you choose for your next no-sand project?
Frequently Asked Questions
Can I paint over a varnished coffee table without sanding?
Yes, absolutely! Varnished surfaces are often ideal for no-sanding techniques. The key is to thoroughly clean and degrease the varnished surface, then apply a high-quality bonding primer designed to adhere to slick finishes before painting.
What’s the best type of paint for no-sanding projects?
Chalk paint and mineral paint are excellent choices as they are formulated for superior adhesion and often don’t require a primer on stable surfaces. For other paint types, a dedicated bonding primer is essential for good results.
How long does no-sand paint last?
With proper surface preparation (thorough cleaning), the right primer and paint, and a durable topcoat, a no-sand painted finish can last for many years, rivaling the durability of traditionally sanded projects.
Do I need a topcoat if I don’t sand?
Yes, a topcoat is highly recommended for a coffee table, regardless of whether you sanded or not. A coffee table is a high-traffic item, and a protective topcoat significantly enhances durability, protecting the paint from scratches, spills, and daily wear.
Can I paint laminate coffee tables without sanding?
While challenging, it is possible. Laminate is very slick, so meticulous cleaning and a specialized high-adhesion primer designed for laminate or non-porous surfaces are crucial. Follow up with your chosen paint and a durable topcoat.